Back to Top

Monthly Archives: January 2013

Geneva Wafers, Department of Yummy

The other day I happened across The Rambling Jour’s blog post (thanks, Rachel, for digging that up!!!) about making Geneva Wafers. someone’s blog post (which now I can’t find or I’d give a link back) where she’d tried making a recipe from the 1860s called “Geneva Wafers.” She didn’t give a link or provide the recipe (but did provide the book title) so I Googled and ended up with the 1861 Mrs. Beeton’s recipe for Geneva Wafers. A bit more Googling revealed that whatever Mrs. Beeton’s source, she has since been widely copied without credit. The White House Cookbook of 1887 has this recipe VERBATIM, and I found it a couple of other places, also mostly verbatim and uncredited. So, yeah.

Anyway, the intrepid Ms. Curley of the Rambling Jour blog  had some pictures of her test (which apparently was delicious but a failure). However, when I saw her pictures I had a pretty good idea of what had gone wrong for her. When I found the recipe, it did look simple, and it was.

This recipe is a major win.

I ended up making two separate batches, in part because the first batch vanished like magic. I kid you not, people took one, looking doubtful, because, come on, they look sissy, and as soon as they ate it, they reached for more. Several more.

I made the second batch to test a couple things but also because the first batch was gone.

The Original Recipe

GENEVA WAFERS
Ingredients
2 eggs
3 oz of butter
3 oz of flour
3 oz of pounded sugar

Well whisk the eggs put them into a basin and stir to them the butter which should be beaten to a cream add the flour and sifted sugar gradually and then mix all well together.

Butter a baking sheet and drop on it a teaspoonful of the mixture at a time leaving a space between each Bake in a cool oven watch the pieces of paste and when half done roll them up like wafers and put in a small wedge of bread or piece of wood to keep them in shape Return them to the oven until crisp Before serving remove the bread put a spoonful of preserve in the widest end and fill up with whipped cream This is a very pretty and ornamental dish for the supper table and is very nice and very easily made Time Altogether 20 to 25 minutes Average cost exclusive of the preserve and cream Ld Sufficient for a nice sized dish Seasonable at any time.

The Recipe – Translated and Very Slightly Adapted

GENEVA WAFERS
Ingredients
2 eggs
3 oz of unsalted butter (6 tbs)
3 oz cake flour (This is roughly 3/4 cup, sift then measure or weigh (* )
3 oz bakers sugar (1/2 cup) (Regular sugar would be just fine)
1 tsp vanilla

1 pint whipped cream
Preserves (or jelly or jam)

* If you weigh your flour, you do NOT need to make the standard regular flour-to-cake-flour adjustment, but make sure you weigh it AFTER you sift it. (a)

NOTE: This recipe seems like a small amount, and I was tempted to double  it. This made 2 dozen wafers NOT COUNTING all the ones I ate before the 2nd baking step. The second batch produced about 18 wafers. Which I suppose means that I ate the equivalent of 6 from the first batch. Maybe. My “disaster save” (b) meant there was unusable (but not inedible) leftover. I HAD to eat it.

Have everything at room temperature.

Pre-heat the oven to 325 F

In a separate bowl, whisk the eggs thoroughly.

Cream the butter. Gradually beat in the sugar until fluffy. Lack of fluffiness is a serious baking problem! (Only slightly kidding.) Beat in the flour, scraping down sides as needed. Beat until fluffy (At least another minute and 30 seconds after all the flour is combined.) (c)

As you can see, the batter is not runny and there’s no tiny butter bits. Also, as a note, we have chickens which means fresh eggs from free-range chickens. The yolks are intensely yellow. If you use store-bought eggs, your batter will probably be less yellow.
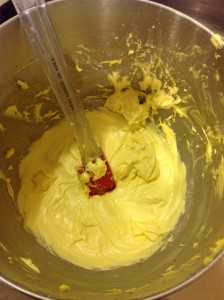
a metal bowl containing yellow batter for Geneva Wafers. There's a red plastic spatula in the bowl

Wafer Batter

I think cooking these on parchment paper might be best, but we were out of parchment paper and thus I could not test that theory. However, if you butter your baking sheet, use a light hand or you will have a mess. (There is a rescue for this if it happens, see below.)

Drop the batter onto the cookie sheet a teaspoonful at a time leaving ample space between each:

6 rounds of yellow batter on a standard sized baking sheet.

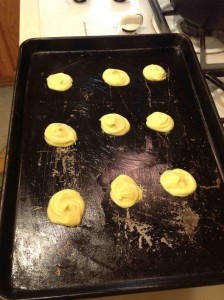
Batter on the Baking Sheet prior to Cooking

Bake for 4-5 minutes. Wafers should be slightly spongy and not in the least brown at the edges. If they have started to turn brown, they will be very difficult to fold. 4 minutes people. (d)

Half baked wafers. No brown edges. You can see how much they spread out during baking.

Half baked Geneva Wafers

Take them out (DO NOT TURN OFF THE OVEN! YOU ARE NOT DONE!) and roll them up in a cone shape. You can see from the previous two pictures how much the batter spreads while baking.

Folding them into a cone shape is easier when the wafers are larger, still warm, and only half-baked. (Heh!)

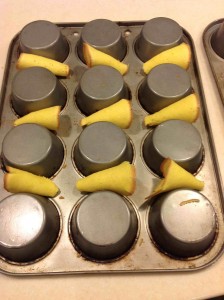
As you can see, I set mine between the cups of an inverted muffin tin.

Half-Baked wafers rolled into cone shape and placed on an upside down muffin tin.

Half-Baked wafer cones

Return them to the oven and bake another 4-5 minutes until crisp (edges will be turning golden brown)

Baked Wafers. The edegs are golden brown.

Baked Wafers

A single baked wafer cone shaped, golden brown edges, no filling in it yet.

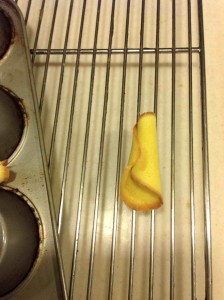
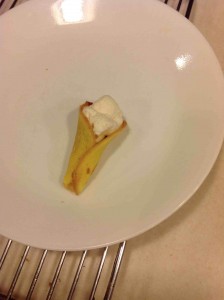
Single wafer, baked cone, no contents

Before serving, drop a spoonful of preserve in the widest end and fill up with whipped cream. The whipped cream will hid a lot of sins. (I do find this to be generally true about whipped cream.)

Several baked wafer cones with a bit of jelly in them.

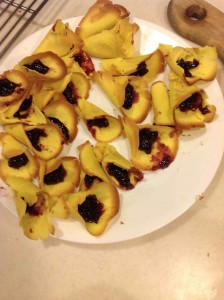
Preserves in the Wafers

Geneva wafers now with whipped cream on them.

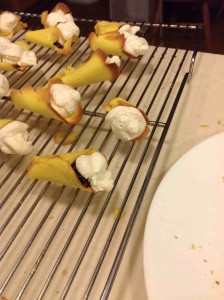
Completed Geneva Wafers.

Some tips

  1. At first I thought these needed salt when I tasted just the wafer. However, once the preserves and whipped cream were in, I decided no salt is needed. They were perfect. Light, delicate, and not at all too sweet.
  2. A teaspoon of vanilla would be a good addition, and yes, I did add it to my 2nd batch.
  3. If you have a pastry bag, you could pipe out a perfectly round wafer, but of course a plastic bag with a hole cut in one corner would work, too. Except it’s probably not worth it, because I still had to use a (clean) finger to achieve a rounder shape, but it was a little easier. No doubt some expert piper would do this effortlessly and perfectly.
  4. Leave A LOT of space between the wafers. Probably no more than 6-9 on a standard cookie sheet. You can see from the pictures that they spread a lot while baking the first time.
  5. The cone shape is easier to achieve if the wafer is 2.5 to 3″ in diameter.
  6. I suspect in the 2nd baking, these could be cooked on a wire rack, but the bread-as-holder idea has merit. I may try that.
  7. You only need a dab of preserves (or jelly or jam), I’d say 1/4 to 1/2 teaspoon. Pipe in the whipped cream (pastry bag, or a plastic bag with the corner cut)

Yum. Really easy and surprisingly quick to make.

A single completed Geneve wafer that is delicious and also very pretty, golden yellow and whipped cream.

Ooh, wafer pr0n

Same wafer from the wide end of the wafer, filled with whipped cream -- and preserves you can't see.

Another view

Some other analysis

From the pictures I saw at the blog that made me want to try this, unless the blogger was unintentionally vague about her process and the pictures, I believe she forgot to put in the flour. She also followed the recipe pretty closely and added the eggs to the creamed butter, which would mean you’d have to be REALLY strict about beating after the other ingredients in order to get the butter to evenly disperse. She may not have weighed her ingredients and might have ended up with far too little flour since her pictures showed a watery batter with tiny bits of butter.

We have a food scale which I used to tare my ingredients to make sure I had the right proportions. As you can see from the pictures, my batter came out smooth and slightly thicker than cake batter. Mmm.

Additional Notes

a. If you substitute cake flour for regular flour in a recipe, it’s 1 cup plus 2 TBS of cake flour for every cup of regular flour.

b. The disaster save: For my first batch in the oven, I over-buttered the sheet. This resulted in wafers that spread too much and were essentially a partially connected blob. I used a round cookie cutter to cut out my wafer shape. Now you understand why I had to eat the overage.

c. The first time, I followed the instructions exactly and added the eggs to the creamed butter, then added the sugar and flour. The second time, I used the “traditional” cream butter, add sugar, then add the eggs, then the flour. Either way, you need to make sure you beat enough for the butter to be thoroughly incorporated.

d. For the 1st batch, I placed the folded wafers in muffin tins. This worked, but not as well as turning the muffin tin upside down and resting them between the cups. (See photo) I think baking them on a wire rack would work better. If you do this, let the wafers cool for 5 minutes or so before removing them from the tin. A knife gently slipped between the muffin tin and the wafer should pop them free if they’ve stuck a bit.

Apologies to anyone who tried to get onto the Riskies recently and couldn’t. Some of us could, some of us couldn’t, but eventually we sent Carolyn out with a blunt instrument and she clubbed something at FB until it lay as a mangled, wretched mess.

So I thought the least I could do to show my appreciation is to continue the saga of the mysterious letter to our hero, which, as you may remember, had a faint violet scent (oh good one, I typed violent first).

My lord, the letter read.

Your proposal interests me greatly.I shall call at three, if that would be at all agreeable.

C

The Earl of Haque dangled the letter between his fingers as he regarded the visitor his butler had announced as Mr. Crewe. “A perfume factory in this house?”

Crewe grinned through gapped teeth. “You said you was agreeable, my lord. Your idea, in fact. Lots of extra rooms, you have here. Close to the canal.” He fingered a priceless Chinese vase on the mantelpiece. “Oops. Sorry.”

Haque tugged the bellpull to summon a footman to deal with the fragments.

“Besides, it’s the least you can do for your brother, innit?”

“Brother?”

“Twin brother.” Crewe beamed. “Identical.”

“Identical?” Haque glanced at the mirror above the mantelpiece, which reflected his blond, well-tailored, six feet of pure lithe muscle [insert suitably heroic description here] and Crewe’s five foot nothing of dark hirsuteness. Something was wrong, very wrong.

“Yep. And I’m the eldest by five minutes.” Crewe produced a handkerchief soaked in his product and blew his nose. He sank onto the sofa, apparently overcome with emotion, and something screamed and fled for the door.

“That was the cat,” Haque said, looking around for a suitable weapon. Yes indeed, the canal was very near, and …

“My lord, a lady has come to call,” said the butler, insinuating himself into the drawing room.

So now what happens?

We’ve just been through a very cold patch of winter here in Northern Virginia, with snow and ice and below freezing temperatures. Parts of the US are seeing even worse. So bundling up and keeping warm have been on my mind these days.

In absence of any other ideas for a Risky Regencies blog topic, I searched “winter” on the Regency Encyclopedia, and came up with What To Wear In Winter in The Regency.

From A Lady of Distinction   –   Regency Etiquette, the Mirror of Graces (1811)
R.L. Shep Publications (1997)

1812 Nov

Satin, Genoa velvet, Indian silks and kerseymere may all be fashioned into as becoming an apparel for the slender figure as for the more en bon point and the warmth they afford is highly needful to preserve health during the cold and damps of winter.

The mantle or cottage-cloak should never be worn by females exceeding a moderate en bon point and we should recommend their winter garbs to be formed of double sarsenet or fine Merina cloth, rather than velvets, which (except black) give an appearance of increased size to the wearer.

Red Morocco, scarlet, and those very vivid hues cannot be worn with any propriety until winter, when the color of the mantle or pelisse may sanction its fullness.

I love the emphasis on looking slim! Some things never change.  And look how similar the colors are to what we wear in winter. I love the rich deep colors of winter clothing.

From Buck, Anne M.   –   Contrib to The Regency Era 1810-1830
The Connoisseur Period Guide (1958)

White muslin was for the whole period pre-eminent for morning wear. Only in the months of mid-winter did the hardy Englishwoman abandon it for silk, poplin or wool.

Nothing sets the dress of 1800-20 so much apart from the style before and the style which followed as the scarcity of the underwear beneath it. A chemise of linen, long, reaching well below the knee; light flexible stays; a petticoat, cotton in warm weather, fine flannel in winter; and then the gown or slip. Many of the muslin gowns were worn over a silk slip.

Straw bonnets were worn during the summer months for walking, Leghorn or fine Dunstable straw, usually plainly trimmed. Fashionable for all the summers of 1815-30, they remained comparatively plain even in the years of excessive trimming. In winter black velvet replaced them.

Black velvet hats sound divine! And note how the lady was supposed to wear as little underwear as possible! Hearty Englishwoman, indeed!

From Cunnington, C. Willett – English Women’s Clothing in the Nineteenth Century
Dover reprint of 1937 original (1990)

The summer pelisse was unlined, the winter pelisse was lined.And more on undergarments by Cunnington, C. Willett & Phillis – The History of Underclothes

And more on undergarments by Cunnington, C. Willett & Phillis – The History of Underclothes Dover (1992)

The petticoat was made of cotton, cambric, linen or for winter, sometimes fine flannel.

The idea of “fine flannel” underwear sounds lovely on this cold, damp day!

De Courtais, Georgine – Women’s Hats, Headdresses and Hairstyles
Dover Publications (2006) says

In winter caps and hats (1800-1810) were often trimmed with fur to match similar edging on robes and coats, but a wide range of materials was used both for the hats and for their trimmings.

I love the fur trimmings. Now we can do this in faux fur and still be animal-friendly!

Gentleman1812

And for the gentleman, from Kelly, Ian – Beau Brummell, The Ultimate Man of Style
Free Press (2006)

Brummell also ordered surtouts or greatcoats from Schweitzer and Davidson for winter wear. They were significantly heavier garments, so much so that they were not

ed in the weighing books at (wine merchants) Berry Brothers. Made out of even heavier worsteds and “Norwich stuff” – another feltlike beaten wool – they were still exquisitely cut and molded.

Yum!!!

What is your favorite winter garment?

I like my cashmere gloves and the new scarf I received for Christmas.

I have a new contest on my blog! Enter here.


Posted in Regency | Tagged | 8 Replies

Balogh_Famous_Heroine

I am currently writing a fluffy historical, sometimes called a wallpaper historical–this is the kind of book where the period is there for mere decoration (hence the wallpaper comment), and period experts will rightly say, “That could never happen in the Regency!”

And usually, I cock an eyebrow when a heroine of any time decides to have sex without considering protection, or the consequences, no matter what time period it is.

But in this book, my hero and heroine will not be going all the way until I’ve figured out how to make it work, in any context (not so much the act itself; I do know how that works).

But my heroine will be doing some heavy petting, so to speak, prior to making a commitment to the hero. I don’t think this is anachronistic behavior; I do believe that human beings of any time did things they perhaps should not. I prefer to think of it that my heroine is extraordinary in any time, although in this period she is an anomaly, particularly as a young aristocrat. Young ladies generally did not do such things. But my heroine, in specific, is.

Perhaps it’s justifying what I’m writing, perhaps it’s just looking at the time through my 21st century eyes, but I am okay with it. The characters are having fun figuring themselves, and each other out, and that shouldn’t be anomalous, no matter when it happens.

Meanwhile, I am glad I have something warm to write when it is so cold outside! Hope everyone is bundled up, sitting at home with a good book and a great cup of tea.

Megan

Posted in Regency, Writing | Tagged | 12 Replies

While I was down with the flu, I was finding it very hard to just rest. I am so unused to lying around and doing nothing! So some of the time I did some crochet and I’ve continued to do bits of it during odd moments, like waiting for my daughter to get out of her play rehearsals, etc… It’s an obsession.

I blogged about Regency Crochet a few years ago. At that point I was unable to discover much evidence of ladies crocheting during the Regency, although it was possible. It was around that time that tambour work (embroidery that resembles crochet on fabric) evolved into what the French called “crochet in the air”. Crochet didn’t become popular in England until the time of Victoria. (Check out that old post if you want to see some examples of truly hilarious modern Bad Crochet.)

Anyway, today for fun I tried googling “Regency crochet”.

austentatiouscrochetI found a book called “Austentatious Crochet: 36 Contemporary Designs from the World of Jane Austen”.  Some of the patterns use crochet technique effectively; some I’m not so sure about as they use swathes of single or double crochet (boring!) to do what might be done with ordinary fabrics. For instance, I think I would redo the cover pattern by just adding the crochet embellishments to a knit top.

There’s an example of another pretty item that uses crochet more effectively, Lizzie’s Lace Mantelet, on the Ravelry website.

Sense & Sensibility Patterns has some crochet patterns mostly inspired by periods other than the Regency, but cute, like these Edwardian style earrings designed by Jenny Chancey.

crochetearrings

At the Jane Austen Centre website, I found a pattern for crocheted gloves.   Now these look fun to make although I wonder if they would stretch as easily as the pattern claims. I have longish fingers and gloves often feel a smidge small to me. If I do this, I’m going to check them against my hands frequently and add rows if I need to.

crochetgloves

The Jane Austen Centre also has a page on the art of tatting. That’s something I would very much like to try sometime. It says it can be addictive and I don’t doubt it would be for me! I have a plain fabric reticule made to go with my Regency gown and it would be fun to decorate it with tatting like the one below.

reticuleAnyone else enjoy handicrafts of any sort, to make or to wear? What should I work on next (besides finishing the mess-in-progress)?

Elena
www.elenagreene.com
www.facebook.com/ElenaGreene